News
How to Roll a Cross Joint
Create Time:2021-11-02 Source: Shenzhen LTQ VAPOR Electronics Co.,Ltd
hether you’re winding up for your annual 4/20 celebration or your regular smoke sesh with friends, it’s always nice to throw a little curveball into the rotation. Something special to wow the cannabis fans in attendance. A cross joint or cross blunt displayed prominently on your table is going to get some oohs and aahs.
Cross joints/blunts are as their name advertises: rolling papers wrapped around your ground up bud into a fat joint, but with a second, smaller joint inserted perpendicular below the tip. This forms a cross shape, or a lower-case letter T, depending on which is more culturally relevant to you. Either way, it’s a great way to ward off any vampires stalking about.
Cross joints require a little extra care to roll than regular joints, and a slow, steady draw so that all ends burn evenly. Still, they’re well worth the effort. If you’ve got your joint rolling down to an art and want to advance into exotic joint/blunt rolling, cross joints are a great starting point. PotGuide is here with some helpful tips and tricks to get you rolling.
Why Roll a Cross Joint?
Whether you’ve seen them in movies like “Pineapple Express,” or rolled by your more experienced friends at smoke seshes of yore, cross joints/blunts are always welcome at a party. Everyone appreciates the extra effort, and you can even smoke two strains out of the same joint.

Throw some heady indica into the main joint with a splice of creative sativa and see what happens as an experiment. Become your own Bill Nye the Science Guy! (For the record, Bill Nye supports weed but does not partake. His former Astronomy professor, the late Carl Sagan, got as high as the stars he studied).
Materials List:
Much like rolling a regular joint or blunt, it helps have all your materials and tools laid out in front of you. You’ll need:
Ingredients for a Cross Joint
- Rolling papers/blunt wrap (both full-size and small)
- Ground up herb (if going with two strains, keep them in separate piles)
- Needle/Paper Clip
- Scissors
- Cardboard (if you want a crutch)
With those assembled, it’s time to roll.
How to Roll a Cross Joint/Blunt
You’ve got your joint tools assembled, so let’s get rolling. The process is essentially the same for blunts so we’ll just cover joints.
Step 1 - Twist Up Your Main Joint
Take your full size rolling paper, sprinkle in your herb, and roll up a fat joint. Pack in more than usual. This will be your main joint. The denser it’s packed, the better it’ll hold the cross joint. Give the joint end a loose twist. This’ll make it easier to light once it’s fully assembled. Throw a crutch in the filter end if you want.
Step 2 - Roll Up Your Cross Joint
Take your small paper and roll up a skinny joint, twisting both ends closed. This is the cross of your cross joint. The smaller your roll it, the easier time you’ll have creating your cross joint.

The larger you roll it, the more evenly your cross joint will burn. Either way, you’ll want it to be pretty densely packed all the way through for stability.
Step 3 - Poke a Hole Through The Main Joint
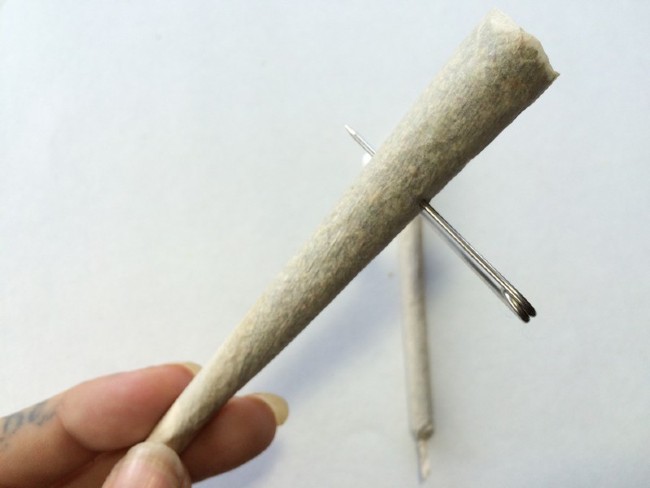
Take your needle or unrolled paper clip and poke a hole through your main joint about a quarter of the way down from the twisted end. Gently start widening the hole by wiggling your needle but be careful not to tear the paper. This is where you’ll slide your skinny joint through to make your cross, so try to make it a little smaller than the width of your skinny joint. This makes for a better seal.
Step 4 - Poke a Hole Through The Cross Joint
With your needle or paper clip, poke a hole through the middle of your cross joint. This is where the smoke from your skinny joint will flow into your main joint. Just like you did with your main joint, gently wiggle the needle to widen out the hole.

The hole in the middle of your main joint should be about twice as wide as your needle. Be careful with this part. If the hole is too small, you won’t get any draw from either joint. If it’s too big, you risk tearing the paper.
Step 5 - Form the Cross
Take your cross joint and gently slide it through the hole in your main joint so that the cross joint’s hole is centered in your main joint. This is easier said than done, so take your time. You’ve got to carefully pull, twist, and push your cross joint through the hole in your main joint without tearing the paper of either.
Step 6 - Wrap the Cross
You’ve successfully slid the cross joint through the main joint. The cross joint’s hole is centered in the main joint, and you didn’t tear the paper. Take a moment to relax and maybe give yourself a high five if there’s no one else around. The hard part’s over.
Take your scissors and cut the glue strips off of two more papers. Moisten the strips, then wrap them criss-cross over the “t” where your joints intersect. You’re trying to form an airtight seal around the holes so that no extra air gets drawn in. This also reinforces the joint. When you’re done, you should have an “X’ of glue strips stabilizing the cross.
Step 7 - Light It Up
You did it! Hold up your cross joint with pride. Use it to ward off any vampires prowling nearby. Once they’re gone, get ready to light it up.

You’ll need some extra hands, and some extra lighters to get it burning evenly, but that’s what friends are for.
The Wrap Up
It may take some practice to get rolling a cross joint right, so don’t stress it if you have to start over once or twice. Even for experienced rollers, it can be hard to perfect. During the learning process, expect a few tears and to go through more papers than usual. Once you’ve mastered the cross joint, you can move on to more exotic rolls, like the trident, the braided joint, or even the tulip.
Photo Credit: Fat Buddha Glass (license)
Saturday April 17, 2021
By Paul Barach
This article is reprinted in potguide


